DIY Laminate Flooring Project
Laying laminate flooring can be done by an experienced flooring company in Virginia. But if you are quite keen about the process of installing laminate flooring all by yourself, feel free to learn a few tricks from our flooring experts!
Before you begin, remember that this requires preparation, which includes protecting yourself from possible injury to your knees. Thus, you need to wear knee pads with cloth, foam, and soft rubber material.
You may also use gel-filled pads as they are more comfortable because the gel helps distribute the weight.
Prepare the room
You must clear out the room where you want to lay in the laminate flooring. Note that when the room is carpeted and you want to re-use or sell it, move it out of the room. But first, you need to release it from the carpet grippers and roll it up.
Tidy up the place after removing the carpet and clearing all furniture. Brush down the area and vacuum the floor to catch finer debris.
Lay the underlay
You may notice that the underlay comes as a roll or square boards. The manufacturer might have included fitting recommendations that you can mimic. Thus, you must leave a few millimeters between each fiberboard and the wall. A little less might be needed between each board for expansion.
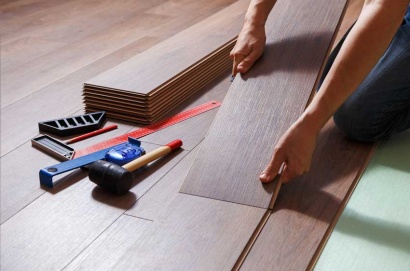
Laying the laminate flooring
Notice the tongue and groove design will be used to connect the slabs side-by-side. The edges will also be clicked into place through a clicking system. This will create a strong surface. You may need to use a table saw to cut some of the slabs to fit in place as you work your way through the room and around the perimeter.
- Begin at the corner by putting your spacers from the flooring kit between the laminate plank and the skirting board. In the absence of a laminate flooring kit, leave ¼ gap or you can use old pieces of wood. Present the first piece of laminate flooring to the skirting board so it can rest against the spacers.
- After the plank is in place, click into position the next one before working your way across the room. When you reach the opposite side of the room to finish the first row, measure the last piece. When it reaches 30mm long, you can use it to begin the next row.
- A 1/4-inch gap around the perimeter is needed to allow expansion. Therefore, you don’t need to cut the piece in order to create a snug fit.
- Slot the final piece into position. Use a hammer and pull bar from the laminate floor fitting kit so that you can lock it into place.
- If the cut-off is too short to begin the second row, you need to put it aside for later use. Then, cut another piece from the plank to begin your second row from the same wall as the first. Place the spacer in position before starting.
Continue doing the process until the new floor is complete. After reaching the final row, cut the laminate flooring planks lengthways, to be able to fit the available space.
If you are uncertain about any step of DIY laminate flooring installation, you can always consult an expert or professional flooring company in Virginia like Hatcher’s Floors to help you out.